Breaking

Thursday, 10 September 2026

September 10, 2026

Changing Nozzle Internal Geometry to Increase FDM Flowrate
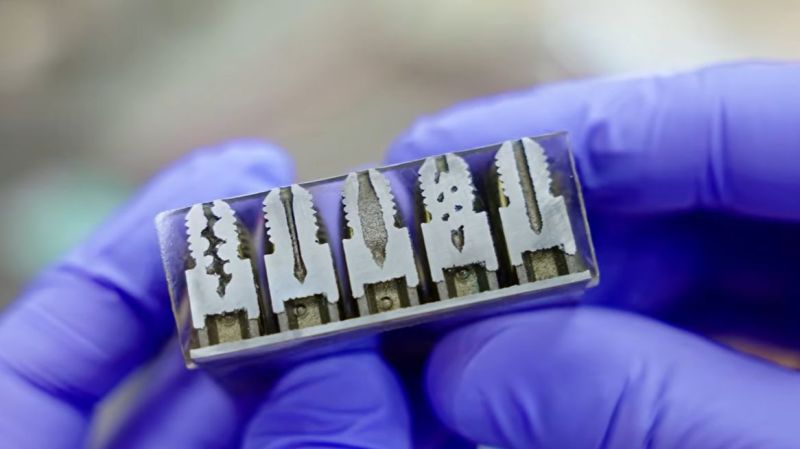
As FDM printers keep getting faster, we are forced to deal with a range of bottlenecks, all of which conspire to hold us back from another Benchie world record. A major physical limitation is that of flowrate, as the hotend has to be able to melt the filament that enters the nozzle before it departs said nozzle. One attempt to make a high-flow nozzle involves splitting the material path into three winding sections, which theoretically should help said flowrate. Recently [Thomas Sanladerer] took a poke at this and other types of nozzle with SLS-printed nozzles.

These printed parts still needed some finishing on the lathe, including drilling the 0.4 mm nozzle hole. The finished nozzles feature a variety of internal geometries, including the aforementioned triple-path, as well as many with various intrusions that seek to maximize the contact area.

Using a Prusa Core One these nozzles were subsequently tested to see what print quality they produced at high flow rates. A special test rig to test the nozzle pressure was also used to further characterize them, as this indicates at which flowrate the nozzle begins to struggle. Among these the Fuge design did the best, though with the big asterisk that these nozzles were printed in MS1, which is in effect tool steel and thus not great for being nozzles.


September 10, 2026

Creating a Custom Hinge for a Motorbike’s Fuel Access Panel

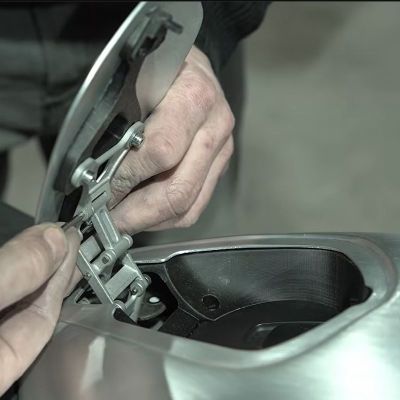
A fun part of modifying something like a motorbike is that you sometimes have to come up with creative solutions to basic questions, like how you can still access the fuel tank’s cap after extending it forward. In the case of [KRTframework] this meant that the fuel cap was now underneath the bodywork, requiring a suitable way to access it. Of course, this meant making a hidden access panel with a custom hinge, to not break the bike’s clean lines.
To make the process as easy as possible, a 3D scanner was used to get detailed measurements on what the new bodywork would look like. Using these the new bodywork was created, including what would be the hidden access panel, yet finding a suitable hinge mechanism wasn’t easy. This is where this custom design was created, with detailed assembly covered in the video.

To bridge the gap between the opening and the fuel tank a part was 3D-printed that also contains the simple push-to-open latch mechanism. Of course, in the comment section people sounded off on this, feeling that it would be far too easy to accidentally open the panel.

The hinge seems to be well-received at least, with it having to fit within the available space, while also providing good access to the fuel cap when opened, meaning quite a lot of travel.


September 10, 2026

Little Droid Has Party Mode

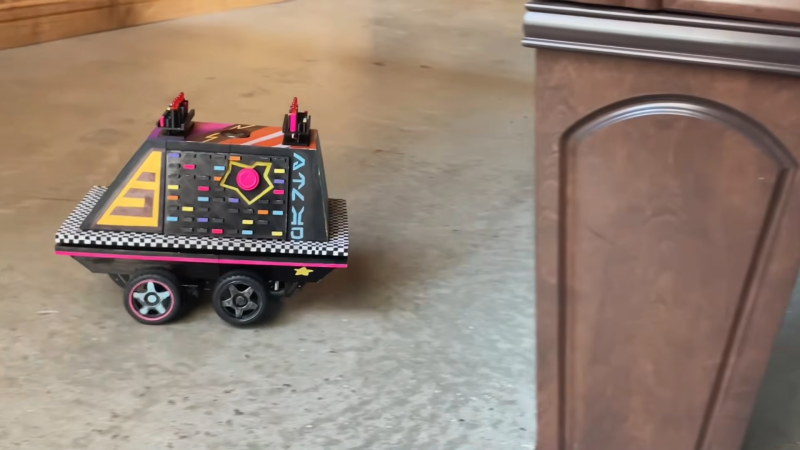
Remember those tiny little droids skittering around the pristine corridors of the Death Star in Star Wars? [heychaostheory] has put together something vaguely along the lines of those charming little mobile toasters. It’s an autonomous mouse droid with party mode!

The build is interesting in that it’s based on an off-the-shelf metal robot chassis—which provides mounting points for the gearmotors and wheels that make up the drivetrain. The mouse droid body sits atop this, being a 3D printed part that is afixed with heat set inserts and nylon standoffs. It’s 3D printed and expertly decorated with a fun vibe. Inside the body lives an Arduino Uno, hooked up to an L298 motor driver board and ultrasound sensors used for obstacle avoidance. It’s also got a smattering of LEDs to flash, because blinkenlights matter. The best bit, though, is the party mode button, which fires off music via a DFPlayer Mini module.

The mouse droid may not be as flashy and imposing as the Droideka or as mechanically impressive as BB-8, but that just makes it more accessible and fun to build. You can easily create one at full scale without breaking the bank. If you’re cooking up your own fun droids in the workshop, don’t hesitate to let us know. Video after the break.


September 10, 2026

3D Imaging Without a Lens

There are plenty of ways to capture 3D images or simulations of such if you know what you’re doing with camera hardware and fancy mathematics. However, a little more unusual is the idea of capturing a 3D image while using no lens at all — and yet, [okooptics] has achieved just that!

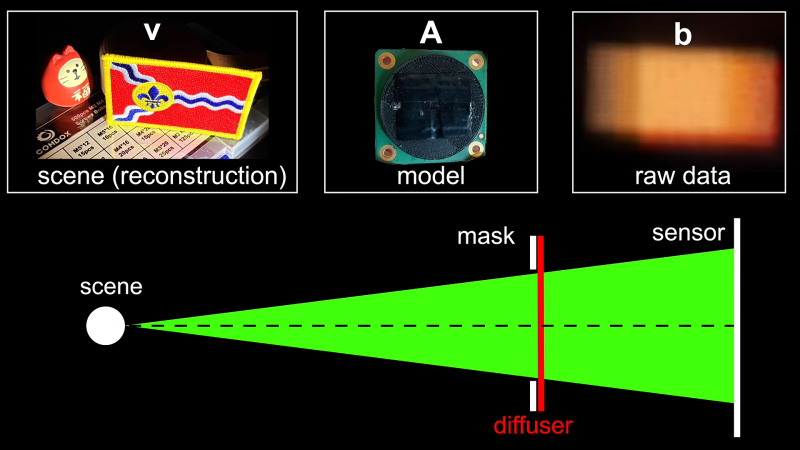
The basic concept builds on an older project from [okooptics], wherein images were captured from a Raspberry Pi camera with no regular lens element installed. In its place was a thin layer of Scotch tape over the sensor, acting as a diffuser. With the right deconvolution math, it’s possible to actually recover a real image out of the blurry mess this setup initially captures. [okooptics] was then able to push this into three dimensions by weighting the point spread function used to deconvolute the image.

Adding directional bias to the process creates a similar effect to slightly shifting the cameras position, actually revealing a view from a slightly different angle of objects in front of the camera. [okooptics] does a great job of explaining the science behind how this is possible and the practical limitations of the technique, also referencing research papers that have explored these ideas in great depth.

It’s math heavy to extract 3D data from what otherwise looks like blurry nothingness, but it’s possible if you know what you’re doing. For a fuller understanding, it’s worth diving into [okooptics] earlier work in this realm, taking photos with Scotch tape in place of a lens.


Wednesday, 9 September 2026

September 09, 2026

3D Printable Lenticular Indicators

You can 3D print all kinds of things, from Yoda heads to little models of Pikachu. Eventually, though, most of us get to a point where we want to print something a little more interesting. The lenticular prints developed by MIT CSAIL are very much that. (h/t Core77).

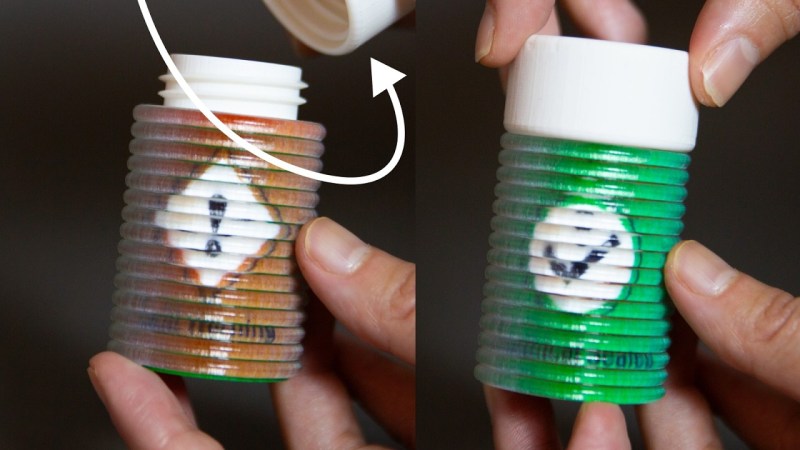
The ShiftLens concept is simple enough—there’s a lens layer printed in transparent material. Beneath that, lives a patterned layer in alternating colors, corresponding with the linear lenses of the layer above. Then, there’s an actuation mechanism that can shift the lens layer relative to the pattern layer. This creates a changing color effect as the mechanism is shifted. The actuation mechanism can be a knob, switch, or roller—anything that moves the layers relative to each other. On its own, it’s a bit of a curio—but there are some fun demos. In particular, using the lenticular printing on a bottle to form an indicator for when the container is closed properly. There isn’t a publicly available design tool for these prints yet, though the team developed one for Rhino that they used internally for the project.

It’s a pretty interesting application of 3D printing, and one that we fully expect a bunch of YouTubers to replicate within the month. We’ve featured some other great print hacks lately, too, like a slicer that lets you print horizontal overhangs without support. Video after the break.

[Thanks to Paul for the tip!]


September 09, 2026

Local LLMs Can Work Better Than Claude, At Least For Some

This is going to be a very personal question, because when you’re talking cloud vs local anything, it comes down to this: how much are you willing to pay for independence? The local option might save you long term, or it might never pay off the capital investment. It will almost certainly cost you your time to set up and maintain your own system — but what you get back is independence. With LLMs, traditionally you lose quite a bit of performance, but as [Anurag Singh] points out on XDA Developers, a lesser model might actually let you get more done, depending on your workflow.

[Anurag] had been on the 20$/month plan with Anthropic when he decided that the scratch just wasn’t worth the sniff– he was hitting usage limits he couldn’t stand at that level, but couldn’t justify a higher tier of access. So he decided to try a local LLM, even though all he had was a 16 GB MacBook Air M5, not a beefy workstation. Since his workflow isn’t so much ‘vibe code the whole thing for me’ as ‘help me find where I went wrong here, electronic rubber duck’, Qwen2.5 Coder 14B proved more than adequate for his use case.

It can’t understand all the moving parts of a large project as well as Claude can — not surprising given how old it is and how much memory it has to work with — but that’s [Anurag]’s job. He’s the programmer, it’s just the assistant. For his use case, he can make use of his existing hardware and having the the LLM right in VS Code is allows for a speedy workflow.

Your millage may vary, but if you want to get into locally running LLMs, we can point you at the easy ways to get started. Depending on your hardware, you might want to grab another GPU.


September 09, 2026

Reverse Engineering The Philips PM5139

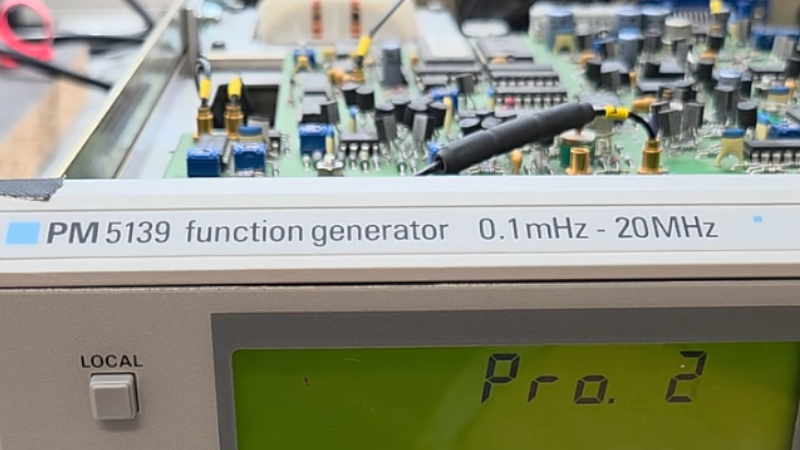
The Philips PM5139 is not famous. It won no great victories on the battlefield, nor was instrumental in changing the political landscape. It was just a useful function generator that you might find on a workbench somewhere, doing its job quietly and relatively accurately. [doctormord] has been doing the work to reverse engineer this humble piece of hardware.

The PM5139 is poorly documented; the only existing service manual out there is for the PM5138A, a less-capable sister model. Hence, there was some value in reverse engineering the device to understand it better. Work started with two EPROM dumps capturing what Philips put in the box all the way back in the early 1990s. From there, the code was examined and tinkered with until [doctormord] felt confident to modify it and improve upon what was already there. This was achieved with the aid of an 8051 emulator that could run the code to make it obvious what was going on. The result was a custom “V2.0” firmware that adds six arbitrary waveforms to the function generator and the ability to play simple music, amongst other tweaks.

We love to see old hardware given new functionality, even decades down the line, and we love some good reverse engineering, too. Video after the break.