Breaking

Showing posts with label Technology. Show all posts

Friday, 9 October 2026

October 09, 2026

Two-Component H-shifter for Racing Sims

Flying and driving simulators can go as far as money will take you, and at some point it might end up being cheaper to buy a plane or race car than to keep adding capabilities to some of the sim rigs we’ve seen. But it can also be a fairly affordable hobby as well, with entry-level components being within reach for many. The price can drop precipitously from there too, provided some parts can be sourced and a 3D printer is made available, and [Jason] is demonstrating one of the lowest-cost H-shifters we’ve seen which only uses two parts at its core.

The two components only cover the electronics for the build, but this gets almost everything needed for the shifter squared away. A joystick like those found inside many game controllers is paired with an Arduino Pro Micro, with a very straightforward wiring configuration between them. These components are paired with a prototype 3D printed case and shift knob which provides the H pattern of choice. From there it’s as simple as uploading some readily-available firmware, which [Jason] also demonstrates, and which has many options for various configurations of shifters.

Although this was just a prototype, it shows was just a few off-the-shelf components and a 3D printer can provide to an affordable driving sim setup. Even then a 3D printer is not always necessary, like this three-pedal setup using extruded aluminum frame as a base. From there, all kinds of other features can be added like force feedback on the steering wheel.



Thursday, 8 October 2026

October 08, 2026

Introducing the Garlic-Powered Door and Window Sensor

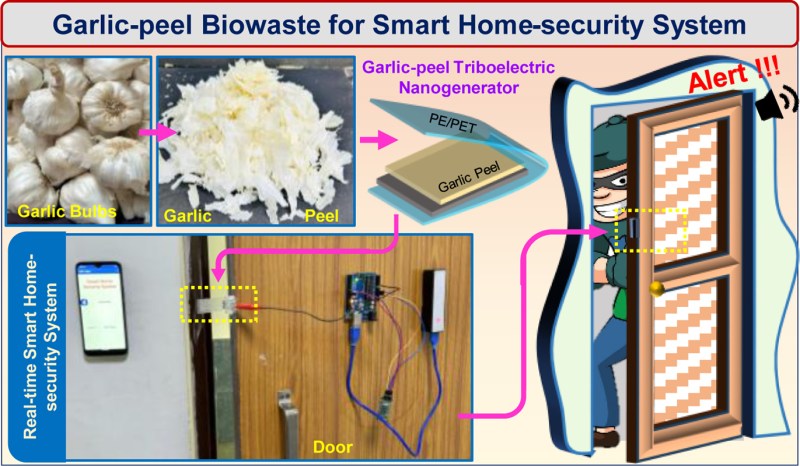
Most home security sensors require a chemical battery or external power source to operate, which can be a point of weakness. If the battery in a window or door sensor dies overnight and nobody is there to swap it, it might miss that one intruder or mess up your carefully curated home automation system. In that sense self-powered sensors are rather interesting, such as this one by [Manas Tiwari] and [Deepak Bharti] that is based around the triboelectric effect.

The research article is sadly paywalled, but the IEEE Spectrum article covers all the salient details. The sensor uses ground up garlic peel for the positive side of this triboelectric nanogenerator (TENG) as they call it, with a sheet of polyethylene (PE) forming the negative side. Once installed on a door frame, opening said door generates about 210 VAC with a 45 µA short circuit current. A dual-side layer of garlic peel bumps this up to 400 VAC and 65 µA.

As installed, the researchers used this generated current to detect changes using a separate MCU running off a powerbank, which obviously does not really solve the ‘running out of charge’ issue. The generated power could conceivably be used to send a brief wireless packet to a receiver elsewhere in the room, somewhat like the Bluetooth link in the example, but more low-power.

The researchers also reported that this sensor was still functional after half a year in storage, and survived 200 stress cycles, which seems like a good start for what appears to be a very cheap sensor to construct.


October 08, 2026

Turning a Run-Over Samsung Galaxy S23 into a Gaming PC

Repurposing old smartphones for more general purpose computing isn’t a new thing, but the project by [LastComputer] ups the ante by going from a Samsung Galaxy S23 that looks like it got run over by at least a few cars to a very serviceable gaming computer, courtesy of its Snapdragon 8 Gen 2 SoC.

The somehow still working but definitely worse for wear phone was purchased for 1,700 Ukrainian Hryvnia (~$40). It being SIM locked also helped reduce the price, even if someone had somehow wanted to use it again as a phone. Since the SoC inside is also used in quite capable gaming handhelds, but with good cooling, that would be a real waste.

Converting it into proper gaming system requires some careful disassembly, some gentle whacking with a hammer to straighten out the frame and a new battery as the mainboard won’t work without one installed.

A 3D-printed phone case glued to an SSD cage for the 512 GB SSD serves as the enclosure, along with two USB hubs, one of which also provides HDMI output. For the active cooling system a heatsink was hot-glued to the vapor chamber with a properly sized fan mounted to it. Here we could definitely see some zip ties being added to prevent it from falling off.

Compared to running the phone in its stock cooling configuration this shaves off about seven degrees C, with thermal throttling noticeably reduced. This consequently provides a much better desktop experience in Samsung’s DeX (Desktop eXperience) desktop mode, which is what’s used for running applications and games.

Running God of War as an emulated PS2 game works pretty well, as does running games with the Dolphin emulator and the GameHub app using which PC games on Steam, GoG and others can be run. Although you can also install other OSes on the phone hardware, Samsung DeX doesn’t appear to be a bad option if you happen to repurpose a high-end Samsung phone that supports this mode.


October 08, 2026

The 80s Called: They Say This DIY Phone Is, Like, Totally Rad

Like more than a few of us , [Kevin Noki] is sick of being pulled out of flow state by that annoyingly addictive black rectangle we all carry around. His solution was to build a phone to escape his phone, in a YouTube video we embedded down below. We’d say that phone is straight out of the 1980s, except it’s not quite a phone. It would perhaps be more accurate to say he’s building a Bluetooth handset– actual telephony remains the province of a professional device with regulatory approval, because getting custom hardware on VoLTE is a nonstarter in many places.

He starts out using an ESP32, because he already had one and why not? It’s got bluetooth, after all. Alas, audio quality he was getting through it was a little too crunchy, so he pivoted to use a dedicated Hands Free Profile (HFP) bluetooth module that is purpose built for exactly this kind of application. He’s selling the design on his website, but given how much detail he shows on screen, recreating your own version would be easy enough to save the quid. You’d be missing out on the STL for the fantastic 80s brick he’s made, which may be the most interesting part of the build to us.

We’d likely have jumped right to CAD and printed out a few iterations of the case until we were happy, but [Kevin] takes a more traditional industrial-design approach, mocking up the phone with XPS foam and a manually-operated hot wire cutter. It’s not a step we see makers take very often, but it pays of here– at least for subtracting material, it’s a very quick way to iterate, and he only needs to do one 3D print for the final version. We also like very high-tech acrylic bending jig, which he uses to put some black LED acrylic over the display.

It’s a lot of work to make you less-likely to grab a phone you still need anyway– remember, there’s no cellular modem in this– but, hey, it beats torturing yourself, or worse, a tamagotchi.


October 08, 2026

Digital Signage in the Browser With Just a Click

There are many ways to display text on a computer screen, but most require at least some manual effort from the user. It’s annoying enough even if you’re dealing with one machine, but it gets even more of a hassle when you’re trying to display something on multiple devices of varying size and capability. That’s where BIGWORDS.PAGE by [SpeakingOfBrad] comes in.

It’s essentially a simple web page you can control via a carefully crafted URL, letting you create all sorts of text displays you can “distribute” to browsers on other devices with a simple link. So, for example, if you wanted to let everyone see what your favorite website is, you need only point the browser on your phone or laptop to https://bigwords.page/#Hackaday. As the image at the top of this post shows, you can also change the font and text colors by adding a few more values.

It’s an easy enough style of markdown that you can manually throw together links without much trouble, but there’s also a visual editor that will spit out a finished link once you’re happy with how it looks. Beyond simple text strings, you can also show images, create countdown timers, and even produce animated presentations that work across multiple pages of information.

The project is released under the MIT license, and the documentation includes instructions for self-hosting your own version. For most folks, that’s probably not necessary, but we can see it being useful if you want to support a number of displays on a local network without having each one connect to the Internet.

If you’re looking for a similar concept on a smaller scale, we recently covered a clever technique for pushing your own content out to a cheap desktop notifier.


Wednesday, 7 October 2026

October 07, 2026

Keep That Old Radio Alive With An ESP32

As the legacy AM broadcast bands fade away, what happens to the millions of devices built to receive them? Many of them will go into e-waste, but with a century of radios to choose from, some of them are collector’s items. Vintage tube radios like the ones [GarethDaviesLondon] has would go silent, so he’s made a small AM transmitter to keep them alive.

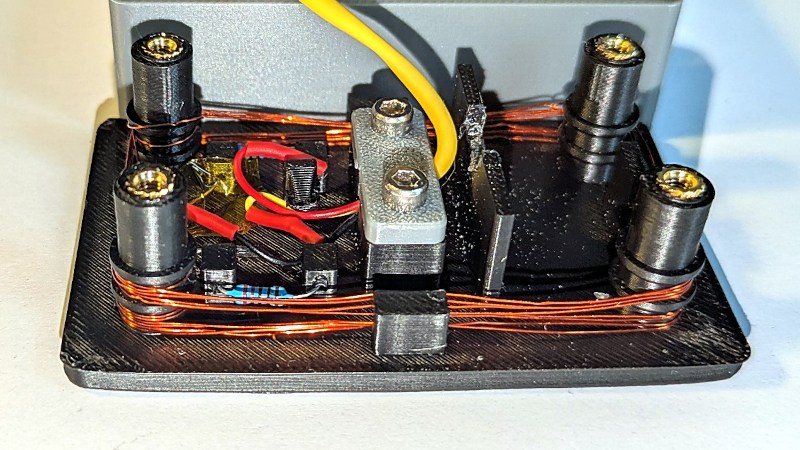
At its heart is an ESP32-S3, which takes an online radio stream and transmits it through RF generated with a pulse chain on a GPIO. Generating analogue signals from radio to video with a microcontroller is nothing new, but perhaps the more interesting part of this one comes in how he radiates enough from that pin. There’s a 3D printed box with stand-offs designed to take a widely spaced wire coil, which is enough for the vintage electronics to pick up. He makes the point that it may not be legal, but at that power we doubt anyone will notice.

The output on this one is 200kHz for the European long wave band, but we’re guessing a higher medium wave frequency could also be generated. Meanwhile if you are curious about AM, we’ve featured someone having a closer look at it.


October 07, 2026

Streaming Games Means the Nintendo DSi Will Never Be Obsolete

There comes a point where you have to acknowledge that your beloved console is out of date and– barring the odd homebrew title– won’t be playing new games ever again. You’d think that Nintendo’s 2008 DSi handheld would be in this category, but [gavff64] has a workaround. What if the odd homebrew title streamed games over the network?

At its core the RNDS-Stream is just decoding an MJPEG stream from a server on a Linux PC, giving you the content of an X11 or xWayland window with relatively low latency at around 15-20FPS. So while you won’t be entering any e-sports tournaments, you can enjoy more relaxed, casual games like Counterstrike. Well, at least there’s no audio streaming yet, so you won’t have to hear the other team’s trash talk. That ought to make it more relaxed.

Sound may come; the project is very much a work in progress, and also a showcase of RubyNDS, [gavff64]’s Ruby-based homebrew framework for the DSi. Why Ruby? Why the DSi? For no other reason than [gavff64] likes both of those things.You can observe it in action after 4:48 in the video embedded below– just be warned, it’s editing is tuned to a TikTok-using audience and won’t be to everyone’s taste. Don’t let videography get in the way, though, because the hack is the thing and it’s up on GitHub for all and sundry under an MIT license.

The DSi is no stranger to hackers, having gotten its first flash cart the year of its release. In spite of that, we’ve seen surprisingly little homebrew for the dual-screen device, this augmented reality app being an exception.


October 07, 2026

Handheld Atari 2600 Packs a CRT

We covered [Nick Bild]’s mini Atari console using original devices not so long ago, and today he’s back with the same console wrapped up with a CRT as a handheld. It would have cost a fortune in D cells to own back in the day, but we know we’d have lusted after one of these in 1979.

He’s called it the µTari Go, pronounced “Microtari”, and it’s a 3D printed affair with the buttons roughly where you’d expect them if you’re used to the Game Boy, and a cartridge socket at the top above the screen.The PCB is the circuit of the original packed into a smaller space, so his claim of using original hardware is valid. The CRT is one of those Sony flattened modules that can still be found in the usual online bazaars, and it packs a small speaker. He’s not been foolhardy enough to equip it with those D cells, so the power is an external 12 V jack.

You can’t not like this project, especially after seeing it in action in the video below. Unlike in the ’70s a USB-C power pack could run this thing with reasonable playing time, so it could even be fully portable if you wanted. You can see our write-up of the board itself here.


October 07, 2026

Repairing a Couple of Very Expensive Registered DDR5 RAM Sticks

It’s definitely a sign of the times when repair shops get handed sticks of registered ECC DDR5 RAM by businesses to try and fix, rather than just tossing the defective ones and slotting in a fresh bunch. This is how [northwestrepair] ended up with two of these ECC RDIMMs, with a current market valuation of a rather nice budget car.

The 128 GB stick was first on the bench, with the fault being that it would fail DDR5 training on boot. This suggests that one or more of the DRAM BGA packages had developed a cracked solder joint, which is something that you could conceivably fix with more diagnosing and testing for a single IC reballing.
In this case doing a reflow cycle was enough to bring the RAM back to life, with the DDR5 training now passing without issues in a test system.

For the 256 GB stick things wouldn’t be so easy, as it seemed completely dead. This suggested a dead PMIC, as this is the component on DDR5 RAM responsible for ensuring that the DRAM ICs even power on. The SPD ROM was another option, so that got swapped first, which does require reprogramming the RDIMM. For this the earlier SPD dump image was reflashed, but swapping this chip made no difference.

After some additional reflowing of a few suspect ICs, still nothing happened. Following this a lot of reballing and other troubleshooting steps followed, only for the problem to be one shorted MLCC and a broken PMIC, potentially caused by whoever dropped said RDIMM onto the server room floor.

Cracked MLCCs do appear to be a very common cause of failures, as they’re often used as filter capacitors, same as for this RDIMM. Checking for shorts across a number of such MLCCs can be a good way to shorten a diagnostic cycle. Since this RDIMM was dropped, reballing every IC probably was still a good move as this may have cracked some solder balls.


Tuesday, 6 October 2026

October 06, 2026

Upgrading An iPhone Lens To The Max

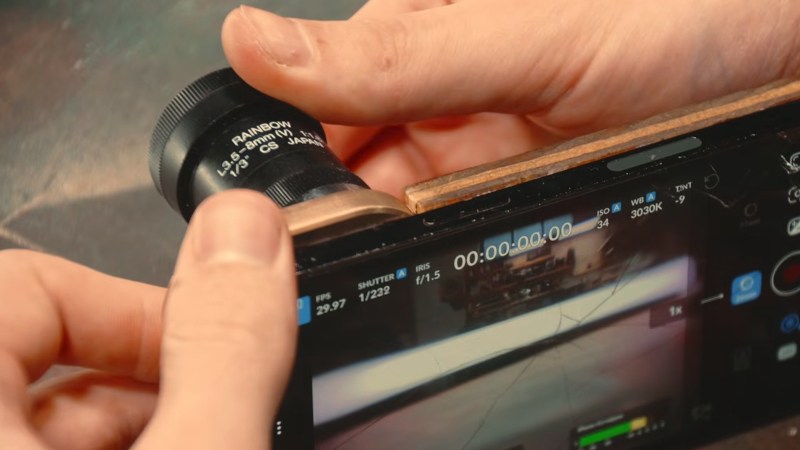
The camera in a typical mobile phone is now at a standard at which it can be considered a serious device rather than a toy, such has been the effort put in by the phone manufacturers. They are still held back in some ways by their lenses despite the same development effort being pointed in that direction, and there have been projects aiming to replace those lenses with better quality ones. A while back we covered [Evan Monsma]’s replacement of his broken iPhone camera lens with a C-mount item, and now he’s back with a much improved version.

The original was glued on with cyanoacrylate adhesive, and this had parted. It was time to upgrade the phone, so he had a new lens mount covering two of the cameras machined from solid brass and leaving an open view for the third and unmodified camera. This was fixed to the phone with epoxy, and with a set of 3D printed lens covers to protect them he’s ready to go. There’s even a tripod thread machined into the bottom of this thing. He shows us it in action with both C-mount and EF-mount lenses, the latter resulting in a very long effective focal length.

We like this project, but perhaps we’d give it an IR filter to remove the unwanted pink glow. If you’re interested, here’s the original version.

Thanks [Luis Mercado] for the tip!


October 06, 2026

DIY Algae Biodiesel is Harder Than You Think

There’s one thing [Silent H] wants you to know before you watch his video about making biodiesel, embedded below: he started this project before he’d even heard of the Strait of Hormuz. No, he’s just independent-minded and wanted to try making his own fuel when diesel was– in retrospect– cheap as chips. That’s probably a good thing, because while [Silent] gets his pint of fuel at the end of the video, it’s not from algae; it’s from a backup crop of sunflowers.

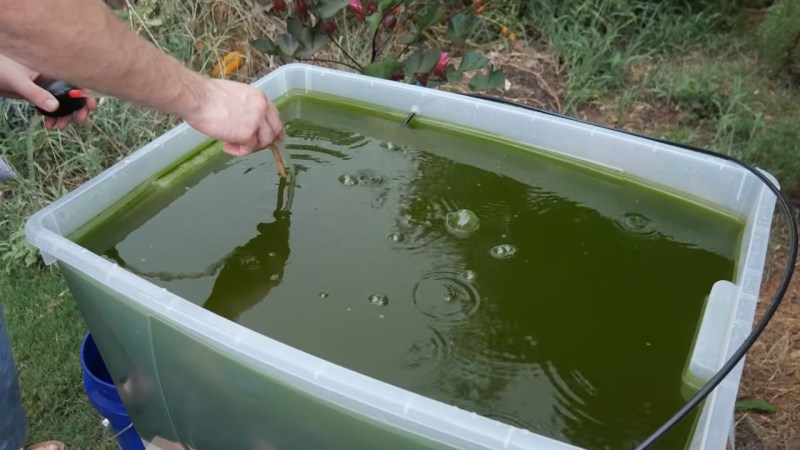
As it turns out, he picked what was the perfect algae and the absolute worst algae for making biodiesel from: Chlorella Vulgaris. It’s perfect because it’s easy to grow, and easy to extract from the growth medium, as it sinks when it is ‘ripe’, and has a very high oil content. Of course [Silent] didn’t want to toss algae cakes into a steam powered canoe, he wanted diesel fuel for his vehicle. That’s where the project broke down: Chlorella Vulgaris cells are exceptionally tough, and if you can’t rupture the cell wall, you can’t can’t get out any appreciable oil. A few grams by solvent extraction is all he manages before switching to more tractable feedstock.

That feedstock is sunflowers, which give up their oil through the application of violent pressure. That is to say, he crushes the seeds in an oil press. Oil acquired, he goes on to transesterfy the stuff, extracting glycerine to produce biodiesel– a process ripe for hacking that you’d think we’d cover more often.

We have covered the algae growth side of things before, but that algae seemed to be destined for other uses than fuel.


October 06, 2026

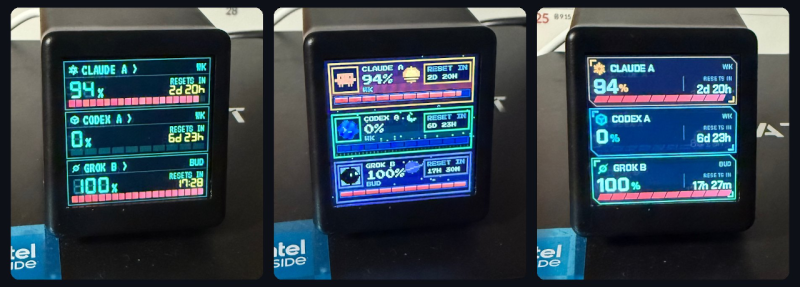
SmallTV Hacking With Surprisingly Little Fuss

We’ve seen the GeekMagic SmallTV line of devices before — these cheap gadgets combine a microcontroller and a display in a little plastic case that can be used to show the time or weather. Powered by either an ESP8266 or an ESP32, the things could easily pass for a hobby build if it wasn’t for their professionally produced enclosures. In fact, we wouldn’t be surprised if GeekMagic lifted the idea from an existing DIY project.

As you might expect we’ve seen several hacks for these devices already, which usually involves replacing the stock firmware. But this latest approach is unique in that you don’t need to mess with the stock software, nor do you need to break out the soldering iron. By leveraging a built-in photo viewer function of the SmallTV [Yongha Kim] shows how you can get the gadget to display pretty much whatever you want.

The trick here is that the image is being generated by a machine on the network, say your desktop or server, and being pushed over to the SmallTV over HTTP. In this example the image is being generated in Python with the Pillow library, and [Yongha] has it showing Claude and Codex usage data, but you could really approach this however you wish.

All you need to do is create a 240×240 image and shoot it over to the device, so you’re free to come up with whatever sort of visuals you’d like. It even supports GIF if you’d like to work animation into it. The content can of course be whatever information you’re interested in showing, and it can be generated by whatever programming language or tool you’re most comfortable with. It’s a fascinating proof of concept, and now that the method has been demonstrated we’re interested to see where the community can take it.

If this all sounds a little too easy for your tastes, don’t worry. There’s a plenty deep rabbit hole you can dive into should you elect to replace the device’s firmware entirely.


October 06, 2026

Scientists Create Hexagonal Packed Ice at Extreme Pressures

One of the problems with planetary science is that you generally cannot easily investigate the exact conditions in their interior, so you’re left to extrapolate what is happening inside them based on surface scans. One of the resulting questions is what ice giants like Neptune and Uranus in Earth’s solar system have exactly at their core. We do know that it is mostly rocks and ice, but what kind of ice you end up with at these intense pressures is a good question that [Alexis Forestier] et al. set out to answer, with their results published in a Physical Review Letter paper (ArXiv preprint).

It’s noteworthy that there isn’t just water ice at these planetary cores, with this study only investigating water ice specifically. In order to get the water to the pressures it would experience courtesy of ice giant gravity, a diamond anvil was used, with synchrotron x-ray diffraction allowing for the changes to the sample to be observed.

The phase diagram of water includes a number of phases beyond what us Earth-dwellers would call ‘ice’, with at higher pressures above about 80 GPa the formation of ice X, featuring a body-centered cubic (BCC) oxygen sublattice. Subsequent discovered phases were face-centered cubic (FCC) and now hexagonal close-packed (HCP) ice, all differing in the packing of the oxygen sublattice.

In addition to extreme pressures, temperatures also had to be increased by using the laser heating feature of the diamond anvil. At around 2,000K and over 200 GPa the HCP phase was found, with a mixed FCC-HCP phase at intermediate pressures.

Although not immediately providing answers to questions pertaining to the aforementioned ice giants, it gives planetary scientists yet another clue that they can use in future investigations, as well as provide more insight into this most fascinating phase of water that’s actually its own little galaxy of phases.


Monday, 5 October 2026

October 05, 2026

Two Microcontrollers Talking, All It Needs is an LED

There are some projects that seem at first sight to be easy, but anyone who tries them finds a whole heap of unexpected problems and turns to the off-the-shelf device. PCB antennas for example, or data links using LEDs, whether IR or visible. The latter doesn’t faze [Luca Soltoggio] though, because he has two ESP32s talking to each other using visible light. Best of all, both use a single LED as both transmitter and receiver.

The software is called SecurePair, and is an Arduino library for exchanging keys and communicating with encryption. The LEDs are the cool hardware hack but it’s designed to work with ESPNow or LoRa too, indeed a typical use case would see light for pairing and wireless for the exchange of encrypted data.. In case you were wondering, it relies on the property of an LED that it’s also a photodiode of sorts. Best of all, while the examples have two ESP32s, it’s not limited to that number and many more can join the conversation if needed.

Check out the video below to see it in action — if you’re curious about LEDs as sensors, we’ve been there too.


October 05, 2026

3D-Printed Filter Removes Most Microplastics From Water

With the rise of synthetic polymers in everywhere from clothing, packaging and beyond, we have also seen a corresponding rise in fragments of these polymers in the environment. These micro- and nanoplastics (MNPs) come in a wide variety of sizes, but have in common that they do not break down very easily, leaving filtration as an important way to keep them out of our potable water sources. A recent paper by [Ethan A. Crawford] et al. in  Separation and Purification Technology details a way to use a low-cost, 3D-printed filtration mesh to filter out up to 90% of MNPs using their prototype.

This prototype uses a multi-layer filtration system printed in PLA, creating a flow-through system in which polyethylene glycol (PEG) acts as a sacrificial additive to the PLA. Whereas creating the fine pores required for filtration of MNPs is impossible using FDM printing, the spheres of PEG that form inside the printed filter can be subsequently etched away using nothing but hot (80°C) water, leaving behind a porous surface capable of trapping fine particles.

These pores are characterized in the paper, with the PLA-PEG10 sample showing the best porous structure while maintaining structural integrity of the PLA material. With 20 layers of these filters a filtration efficiency of 90% was achieved, though as the authors note aspects like improving the system and potential reusability still have to be investigated.

We have previously looked at MNPs, including how little we know about how many of them really are inside our bodies right now, and how lab gloves may be contaminating test results.


October 05, 2026

Ambition, Thy Name is a 3D Printed Transonic R/C Jet

Building anything that flies from scratch is an ambitious undertaking, even if it’s ‘just’ radio-controlled. 3D printing the aircraft isn’t that odd these days, but putting a hot jet engine into a plastic airframe is another ambitous reach. Getting said 3D printed airframe up to the transonic speed of Mach 0.8? Ambition, thy name is Kingchaser. Or at least, that’s the name [The Mach Initiative] give to their very ambitious aircraft, the video about which is embedded below.

The airframe is largely 3D printed from PETG– that’s all the orange bits– but there are carbon fiber rods and an aluminum frame to help take up the strain. The black section around the motor is printed from PPS-CF– that’s Polyphenylene sulfide with carbon fibre–wrapped in carbon fiber to take the heat. This all builds off a smaller PLA version that’s already flown called Kingfisher, which claimed the title of the first 3D printed jet. That flight is on their YouTube channel, if you’re interested.

Now with a bigger aircraft and a much bigger engine– 300 N or 68 lbf of thrust– they’re going for the speed record. If they get even close to the design goal of mach 0.8, they’re absolutely going to leave the world’s fastest drone– a 626 km/h quadcopter we’ve written about— in the dust.

The switch to PETG from PLA, for the record, was to deal with the expected aerodynamic heating at that speed, about 990 km/h or 615 mph. An interesting detail many don’t bother with when it comes to 3D printed airplanes is that the skin has all been polished smooth, since skin drag is dominant at that speed regime. The video is just chock full of those little details that it takes to defeat drag and get to the record speed, and there’s more to come from [The Mach Initiative].

Speaking of remote controlled speed records, we covered another batch of brits take home the land speed record a few years back. May [The Mach Initiative] see such success!


October 05, 2026

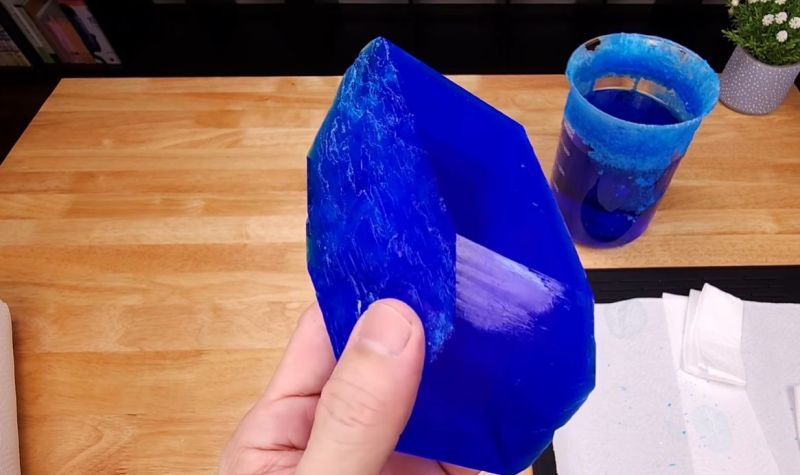
How to Grow a Giant Crystal from Copper Sulfate

Copper sulfate crystals are probably among one of the prettiest crystals you can grow at home, with even just a simple setup with some copper scrap and vinegar already capable of producing lots of them. Yet what if you want to grow really big ones? In that case the [Crystalverse] has got your back, with a recent video that expands on an older blog post.

In lieu of the copper-and-vinegar approach you can also obtain copper sulfate directly, since it’s a common fungicide, rootkiller as well as drying agent. This means that your local brick-and-mortar retailer or favorite online store probably has a few kg of the stuff available for sale.

As with most large crystal growing procedures the key is to have a saturated solution, which for copper sulfate just takes near-boiling water, to create a mesmerizingly blue liquid if there are no contaminants in it. By adding slightly more copper sulfate there are also crystallization sites on the bottom of the jar to draw these away from your large crystal.

From there it’s the same as with growing other large crystals – even those from sugar – with a seed crystal suspended into the solution, along with a silent prayer to the crystal gods that said seed crystal continues to grow without any defects. One gotcha with copper sulfate crystals is that the intense blue color is largely due to the presence of water molecules. This means that once it dehydrates, it turns effectively white.

Also of note that is the slower the crystal grows, the better the result is likely to be. During the months that it takes for these large crystals to grow, you need to carefully manage the copper sulfate solution, remove competing crystals on the bottom of the container and keep the temperature as constant as possible.


Sunday, 4 October 2026

October 04, 2026

It’s GW-BASIC, Jim, But Not as We Know It

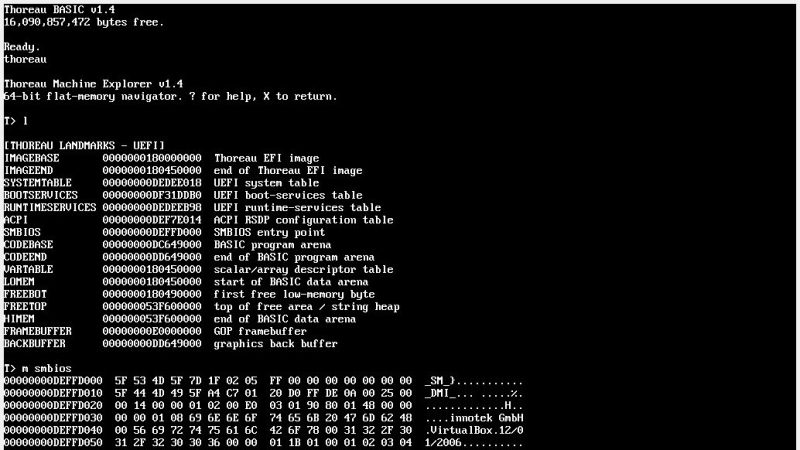
Back in the old days the IBM-PC, like most of its contemporary computers, shipped with BASIC in ROM. Even after it stopped living in ROM, IBM-Compatibles shipped with GW-BASIC, and now we have a project that asks: what if they still did? Thoreau BASIC is GW-BASIC, but updated for the 21st century.

It’s meant to be code-compatible with all old GW-BASIC code — which means, yes, line numbers and GOTOs abound — but it can boot from a modern x86 PC’s UEFI or run under Windows and take full advantage of modern hardware with 64-bit memory and multithreading support. Graphics are 24-bit at any resolution your monitor can handle, and there are a number of handy built-in commands to handle file management, graphics — including sprites — mouse and keyboard input, 32-channel sound, and more. It is also not strictly an interpreted language. Programs can be compiled to run under Windows or bare-metal on UEFI x86 machines.

It’s not open source, but the project is “pay what you want” over on Itch.io, where you can also see a number of examples.

We’ve seen other attempts to revive BASIC over the years, like MoonBASIC or BASIC-256, but we have to admit it’s never going to be the dominant force it once was, regardless of how nostalgic we might get. That’s probably for the best, but it’s still nice to know you can boot to BASIC if you really, really want to. Do you think it would work with our preprocessor?


October 04, 2026

Upgrading a Benchtop Laser for Megawatt Power

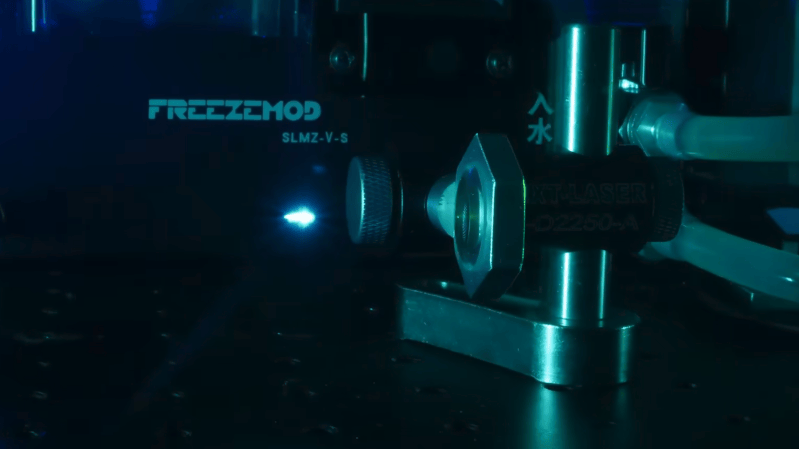
A dark optical bench is shown, with a lens in the right-hand part of the image. In front of the image, a bright blue spark appears in the air, with no equipment near it.

One fascinating thing about a pulsed laser is that, though the average power may be measured in watts or milliwatts, the peak power can easily reach millions of times that. This happens even in normal operation, but as [Les’ Lab] demonstrated, adding a Q-Switch can considerably enhance the peak power.

A Q-switch is an optical attenuator; when placed in the laser cavity, it keeps the cavity from reaching resonance. This greatly limits stimulated emission, allowing energy to build up in the chamber as the gain medium becomes increasingly saturated. Eventually, at some energy level, the Q-switch suddenly stops blocking light, and the cavity lases in a very short, powerful pulse. The Q-switch doesn’t increase the energy in a laser shot, but it does release it much more quickly. In this case, [Les] used chromium-doped yttrium aluminum garnet crystals as the Q-switch and compared performance across several different crystals.

[Les] used two sensors to measure the laser pulse: a pyroelectric energy sensor and a fast photodiode to measure the pulse’s shape. Without the Q-switch, [Les]’s laser produced a pulse about 150 µs long, with a total energy of about 137 mJ and a peak power just under one kilowatt. After adding a Q-switch, the pulse dropped to 14 ns, and the peak power rose to 1.3 megawatts, though the total energy dropped to 77 mJ. [Les] also built an absorption meter and used this to compare several Q-switches with different absorptions; in general, greater absorption increased the peak power when the laser did fire, reaching 2.25 MW at 92% absorption. Increased peak power didn’t translate into greater cutting power, though; when aiming at a metal target, the pulse was too short to do much more than ablate the metal’s surface. The energy output was, however, enough to ionize air or shatter glass at the laser’s focal point.

This isn’t the only enhancement [Les] made to his former tattoo-removal laser; this builds on a previous upgrade to the gain medium itself. For more background on why Q-switches work, check out our article on laser fundamentals.


October 04, 2026

Hackaday Links: October 3, 2026

Hackaday Links Column Banner

If you’re interested in aerospace, there’s an excellent chance you’ve heard the rumor that NASA is trying to get its SR-71 flying again. Or at the very least, they are interested in what exactly it would take to bring the iconic Mach 3+ spy plane back online.

The story started a couple of weeks ago when NASA Administrator Jared Isaacman announced the agency would be reinvesting in their famed “X-Plane” experimental aircraft program in an effort to get “back in the business of flying high and fast again.” Not long after, keen-eyed observers noted that the SR-71 that had been sitting on the tarmac at the Armstrong Flight Research Center in California had been moved to an unknown location. Several individuals who worked on the plane while it was operational have since claimed NASA representatives contacted them about potentially refurbishing it.

So will the Blackbird fly again? Almost certainly not. It would be hard enough getting even a normal plane airworthy after sitting dormant for nearly three decades. But when you’re talking about a bird as rare and secretive as the SR-71, the challenges would be almost insurmountable. Of course, that doesn’t mean there aren’t some valuable lessons to be learned by studying the idea, and we imagine that’s what NASA’s really after.

The SR-71 is one of the fastest planes ever built, but it’s got nothing on an orbital spacecraft like the SpaceX Crew Dragon, which earlier this week set the record for the fastest rendezvous with the International Space Station by an American vehicle. The Crew-13 mission lifted off from Cape Canaveral Space Force Station at 11:10 AM Eastern and docked with the orbiting laboratory at 7:05 PM — a total elapsed time of just under eight hours.

While the crew was more than happy with the relatively speedy commute, their trip was still considerably longer than that of their Russian counterparts. The Soyuz capsule can reach the ISS in around three hours under ideal conditions, and even when it uses the slower rendezvous profile, docking takes place about six hours after launch. Counterintuitively, this doesn’t mean the Soyuz is actually faster or more capable than the Crew Dragon. Instead, it’s down to logistics with a sprinkling of the arcane magic that is orbital mechanics.

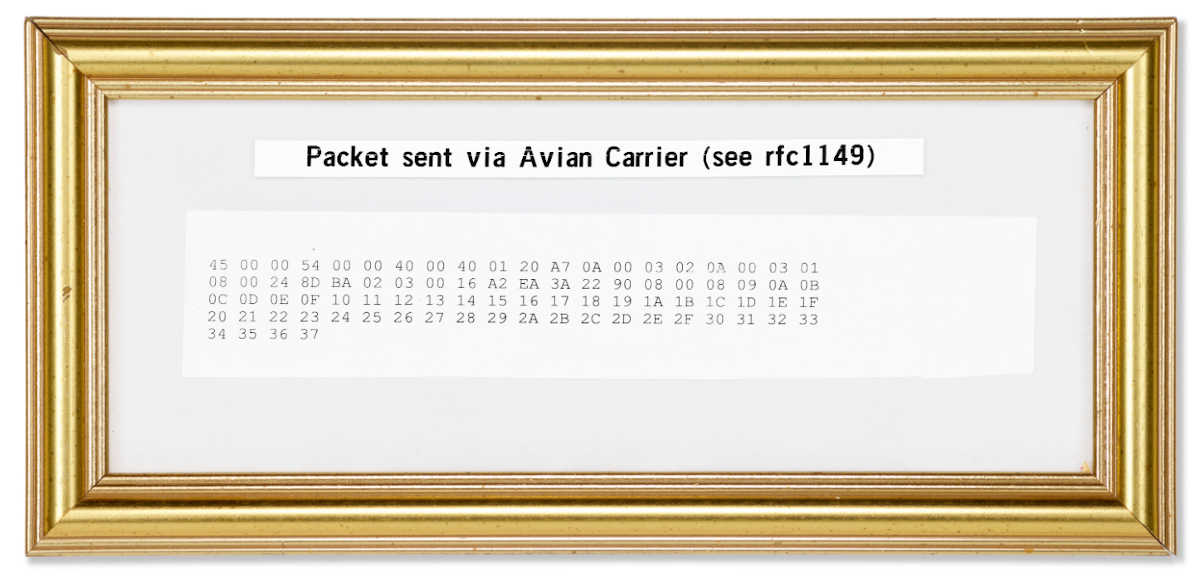
At the other end of the speed spectrum, Christie’s is currently running an auction for one of the printed packets sent via carrier pigeon by the Bergen Linux User Group in Norway in 2001. It is one of nine such physical packets that were sent as a real-world demonstration of RFC 1149, A Standard for the Transmission of IP Datagrams on Avian Carriers.

This packet in particular was later presented to the author of RFC 1149, David Waitzman, and comes in a golden frame befitting such an auspicious datagram. As of this writing, the auction still has nine days to go, and the high bid is sitting at $2,600 USD. We’ll keep an eye out and let you know what it sells for in the end.

We saw an interesting article on PCWorld a couple of days back about a player getting banned from Valorant once they tried running the game on a used CPU. After contacting support, they found out that the Ryzen 7 5800X3D in question had been blacklisted by the game because it was previously used by a cheater. In addition, as the system had now detected it being used in a different computer, the identifiable components of that machine had also been added to the block list.

If you’re building a gaming machine on a budget, this is something of a nightmare scenario. But if this becomes more common, it strikes us that there’s some potential here for those of us interested in buying used hardware for more practical purposes. If you’re on the hunt for a good deal on a high-end CPU so you can crank out builds faster, the fact that it might be banned from the latest loot shooter isn’t really a problem. It’s a bit like looking for a phone with a bad ESN because you want to use it on WiFi or need some of its parts.

Finally, we’ll leave you with a fun little diversion: Hole Punch. This game tasks you with steering a spacecraft around various obstacles to reach a target location. Sounds easy, until you realize that you’re not the one flying the thing. Instead of having direct control over the vehicle, you play as an omnipotent creator who can create and place black holes at will.

Placing a black hole creates a gravitational field that will curve the spacecraft’s trajectory as it goes by, so by adjusting the size and placement of the holes, you have an indirect method of controlling the craft. Creating a black hole consumes matter, and you only have a finite amount to work with, so use it wisely. Let us know how far you get in the comments.


See something interesting that you think would be a good fit for our weekly Links column? Drop us a line, we’d love to hear about it.